My U-Test-M Tube Tester Project (Part 1)
So for a little background, my grandfather, William P. Laney, Sr., moved his family to California in February 1961 to manage the Southwestern office office for Ettco Distributors in Covina. Ettco placed tube testers in the major Drug and Grocery Store Chains, as well as smaller independent convenience stores, in California and the southwestern United States until the early 1980s when tube technology was officially supplanted by solid state TVs and Radios. Ettco was eventually acquired by Arrow Electronics.


My father, William P. Laney, Jr., was in the middle of his freshman year when they moved from Denver, Colorado to Covina. He had a interest in Amateur radio, earning his Novice license in 1962, and eventually pursuing a career in Electrical Engineering and earning his Advanced Class eventually (though he did pass his Extra after I did, not to be outdone by his son who did not have to learn CW to get licensed :-) ) He is still licensed as WB6HNY. My dad worked for my grandfather throughout High School and College, and even when I was young he would get calls to go fix a tester here and there (and I sometimes got to go with him). Here is a photo of me in my crib with my dad (I shared a room with dad's electronic equipment)...note the tube tester in the bench behind me.

So growing up with a Ham Radio dad, and seeing him work on these testers, I was wishing to find one that I could restore (I have a interest in old USAAF radios and tube technology) and use in my shack. My friend from the Johnson County ARC, Joe Krout (W0PWJ), heard that I was looking for one, and he just happened to buy a foreclosed house that had one under the stairs into his basement, it was in rough shape and was filled with several hundred tubes. He offered it to me for just $40, and I jumped at the opportunity.
My son Sam and I drove up to Kansas City, Kansas and picked it up and this is what it looked like after we got it home.
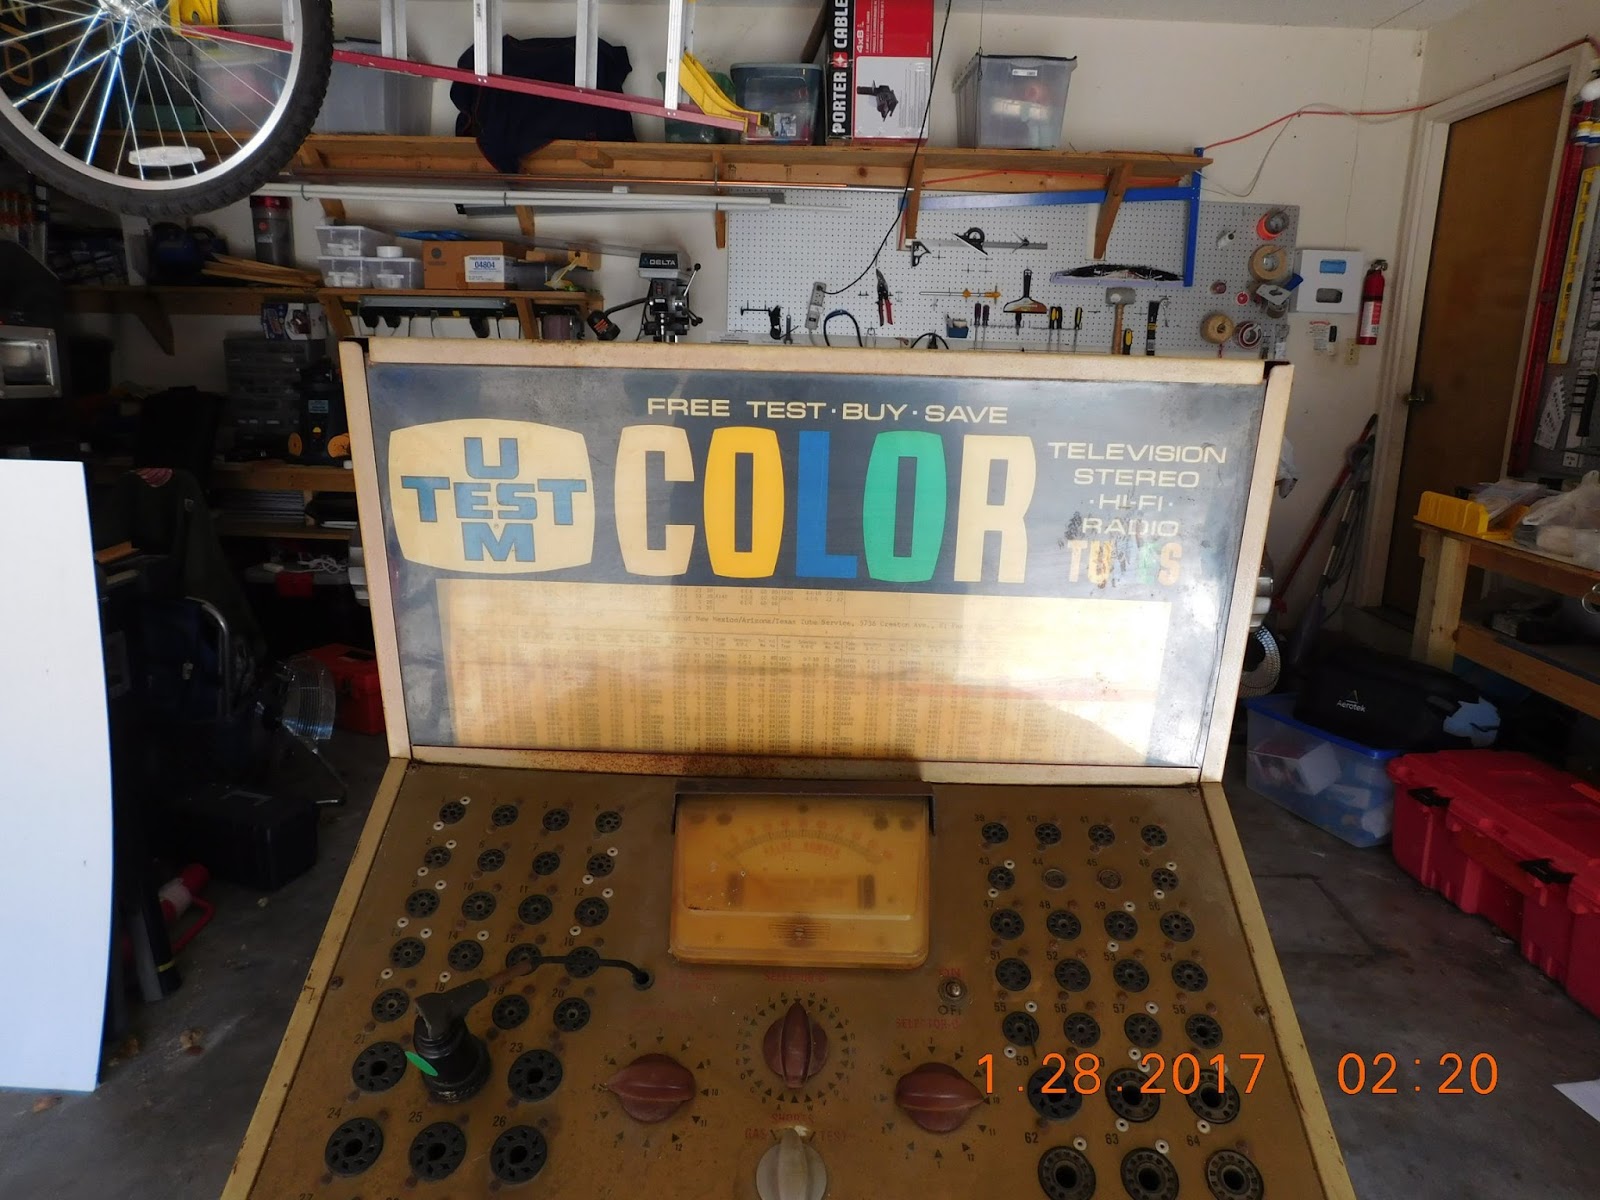
It is U-Test-M Model 2400, Serial number 8218, and according to a label and marks on the reference data it belonged to Arizona Tube Service in El Paso, Texas. The last record (written on some masking tape under the socket panel) that stated the last service was July 3, 1974 (I was four years old at that time). As you can see from the following pictures the cabinet was in poor shape, but surprisingly it was still working and the tubes I tested on my Mercury tester matched up with the results on this tester.
It was dented, rusted, beat-up, the meter was oxidized, and in general need of refurbishment. I had to decide how to proceed. I figured there was no point in trying to bring it back to factory fresh condition. I wanted it to look good, and be a functional tool (and conversation piece) in my shack. So I set out to accomplish the following:
- I stripped it of old paint and rust and prepare it for new paint, inside and out.
- The interior of the upper portion would be painted flat white inside.
- The bottom would be painted black
- I would paint the drawers light blue (Rustoleum Painter's Touch Spray Paint: Gloss Seaside)
- I found colors that roughly matched the exterior (Rustoleum Painter's Touch Spray Paint: Gloss Warm Yellow and Satin Espresso)
- I used Turtle Wax de-oxidizer kit intended for bringing car headlamps back into shape for the meter cover.
- I replaced all the screws, the adjustable foot bottoms, drawer cotter pins with new hardware (I will eventually replace the rusted tube socket rivets but that is for the future)
- For the most part I left the electronics alone, though I did replace the power cord and associated wiring from the power cord to the panel with new wire and used PowerPole connectors to make it easy to disconnect the panel for work
- I would not worry about doing any sheet metal work or re-fabricating major dents, like the one in the front area.
I started to take it apart on January 28, 2017. First I cleaned is with TSP, and once I had it dismantled, i went about using a side grinder, power drill with wire brushes, and a Dremal tool with various wire brushes to remove paint and rust.
I started with the front door (which had the worst of the rust problem. I took the front off the door by drilling out the pop rivets and grinding off the paint and rust. I painted it to see how the colors looked and reassembled it.
I obviously did not try to salvage the sticker on the front (well I did, but part of it did not want to peel off). I did save the part i got off and took high resolution photos in case I decide to reproduce it later. My dad had a spare U-Test-M lock/latch in his box in Tuscon, AZ so he gave it to me.
Continued in Part 2